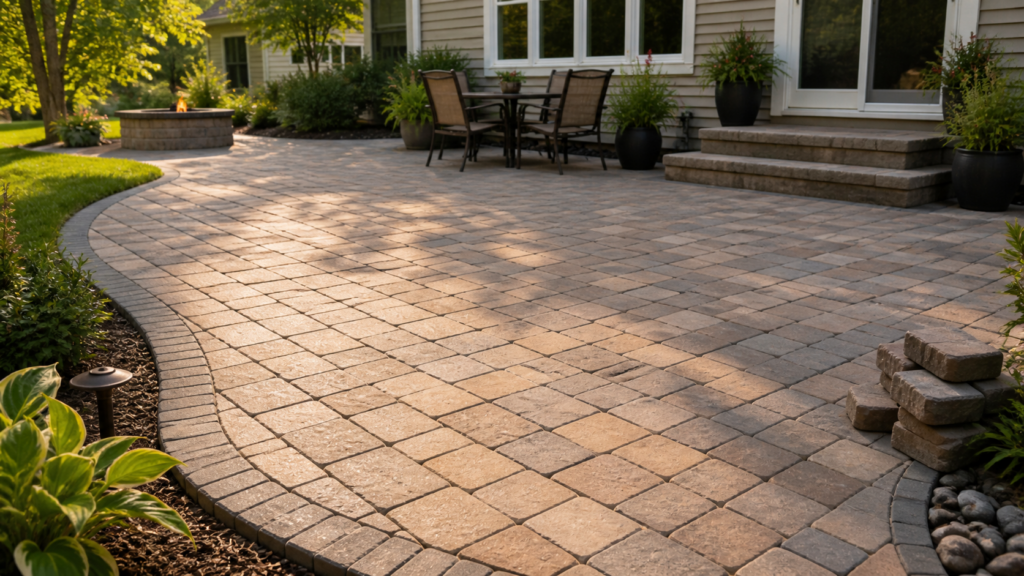
A paver patio should feel solid, drain properly, and stay level—so if it sinks, rocks, or puddles, it is time for paver patio repair. When problems show up, the patio is not just looking rough. It is telling you something about the base, the joints, the drainage, or all three.
In Northern Illinois and across Illinois, patio issues can show up faster because seasonal temperature swings and wet periods put stress on anything that is not compacted and drained correctly. The good news is that most paver problems are fixable without starting from scratch, as long as you match the repair to the real cause.
This guide breaks down what homeowners are actually searching for right now: how to fix sinking pavers, when paver patio leveling makes sense, when polymeric sand replacement matters, how to stop weeds between pavers, and how to maintain a patio so it stays stable and looks sharp.
Table of Contents
What are the most common signs you need paver patio repair?
The easiest way to think about pavers is that they work as a system. The surface you see is only the top layer. When something underneath changes, the surface shows it.
Common warning signs:
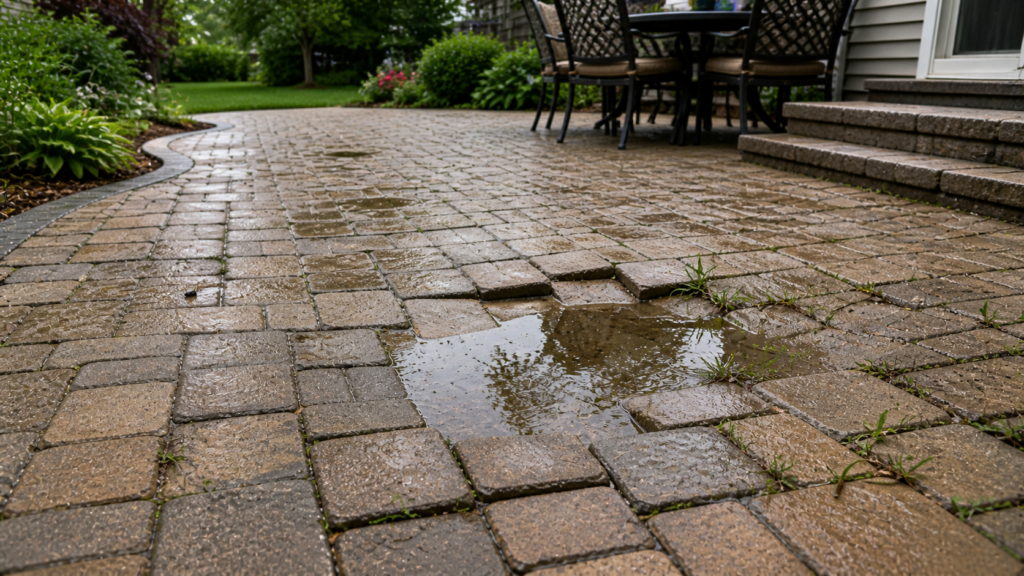
- You feel a dip or a soft spot when you walk across the patio
- Chairs wobble because the surface is no longer level
- Water puddles in one area instead of draining off evenly
- Joints look washed out, low, or empty
- Weeds, moss, or ants keep showing up between pavers
- Edge pavers spread or drift outward over time
- You see hazing, shifting, or uneven heights where sections meet
Quick self-check: Stand at the patio edge and look across the surface at a low angle. If the joints look like a wavy line instead of a consistent grid, you probably have settlement or heave.
Problem-to-likely-cause table:
| Symptom | Most likely cause | Why it matters |
|---|---|---|
| Low spot and puddling | Base settlement or drainage path | Water accelerates washout and movement |
| Loose or rocking pavers | Joint sand loss or bedding disruption | Movement spreads to neighboring pavers |
| Weeds between joints | Joints staying damp and open | Growth is a symptom of joint conditions |
| Edge spreading | Weak edge restraint or base failure at edge | The field can slowly unravel |
| Sunken strip near downspout | Concentrated runoff | Water erodes joint sand and bedding |
If you are seeing more than one symptom at once, it is a strong sign that you need a targeted evaluation before the damage spreads. [1]
Why are my pavers sinking or my patio uneven?
Most homeowners assume sinking means the pavers are defective. In reality, it almost always comes down to what is happening under the pavers.
Base and subgrade basics: A paver patio is designed to distribute weight through a compacted base and a thin bedding layer. If either layer gets soft, washed out, or uneven, the pavers follow it.
The most common reasons patios become uneven:
- Compaction gaps: The base was not compacted in consistent lifts, so it settled later under use.
- Water movement: Runoff, downspout discharge, or poor slope lets water move fines and create voids.
- Freeze and thaw stress: Water that sits in joints and bedding can expand when it freezes and loosen the system over time. [6]
- Edge restraint failure: When edges are weak, pavers can migrate and open joints.
- Soil conditions: Expansive or wet soils can move more across seasons, especially when drainage is not managed.
- Hidden load changes: A hot tub, heavy furniture, or concentrated foot traffic can reveal weak spots.
Compact text chart: cause clues you can spot
Cause: Water path problem
Clue: low spot near a downspout or along the house line
What it suggests: drainage correction should be part of the repair
Cause: Base settlement
Clue: broad area feels slightly low, not just one paver
What it suggests: releveling a section, not just replacing a paver
Cause: Joint failure
Clue: joints look empty and pavers rock at corners
What it suggests: re-sanding and compaction, then monitoring
A professional repair plan typically starts by finding the water pattern first, then matching the fix to the scope of the movement. [1]
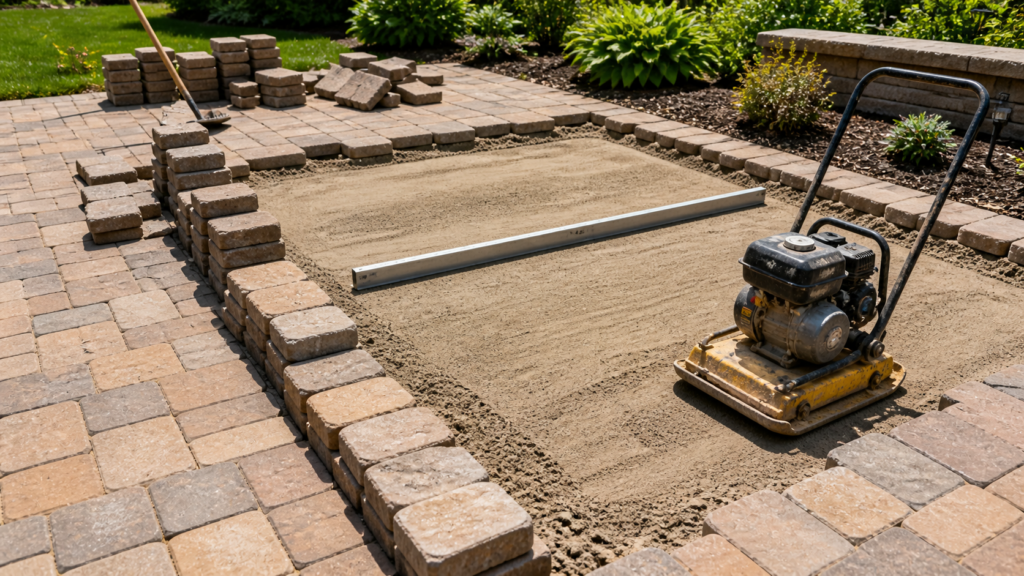
How do you fix sinking pavers the right way?
The right way to fix sinking pavers is to rebuild and compact the layers underneath, not just reset the surface.
A typical professional approach looks like this:
- Mark the affected area and remove the pavers carefully
- Inspect the bedding layer and base for soft spots, voids, or washout
- Remove failed material and recompact the base as needed
- Restore a smooth bedding layer and set final grade and slope
- Reinstall pavers, align joints, and compact the surface
- Refill joints with the correct sand and compact again
- Confirm drainage so water is not feeding the same problem
What homeowners often get wrong: Fixing only the visible pavers while leaving the soft base underneath. That usually feels better for a week, then settles again.
Safe DIY vs not safe DIY:
- Often safe: Replacing a cracked paver, topping off joint sand, hand-pulling weeds, light cleaning.
- Higher risk: Releveling a sunken area, rebuilding edges, correcting slope, using high pressure cleaning that strips joint material.
If you are unsure how deep the settlement goes, it is usually cheaper to get the diagnosis right the first time than to re-do the same spot twice. [1]
Do you need paver patio leveling or a full rebuild?
This is one of the most common decision points, and it is where homeowners can save money by matching scope to reality.
Key idea: If the majority of the base is stable and only sections moved, releveling targeted areas can restore performance. If the base is failing across the patio, patching turns into a cycle.
Decision matrix:
| Situation | Best fit | Why |
|---|---|---|
| One corner is low near a downspout | Targeted releveling and drainage adjustment | Fix the water source and the settled section |
| Several low spots across the field | Sectional releveling | Multiple weak areas can still be repaired if base is mostly sound |
| Edges are spreading and joints keep opening | Edge rebuild and re-sanding | The perimeter controls the field |
| Patio is uneven everywhere | Rebuild likely | Widespread base issues usually require broader correction |
| Puddles remain after multiple repairs | Regrade and rebuild sections | Water is telling you the slope is wrong |
Inline reality check: If you can rock pavers in multiple areas, or if joint sand keeps disappearing even with normal use, the system is not locked in the way it should be. [1]
For homeowners planning upgrades, this is also a smart time to decide whether a repaired patio should transition into a bigger layout. If you are considering walkways, steps, or a seating wall, The Ultimate Guide to Hardscaping can help you plan the full outdoor footprint.
What causes patio settling and how do you prevent it from happening again?
Patio settling repair is most successful when it includes prevention steps that keep the same forces from repeating.
The usual settling triggers:
- Water concentrates in one zone and erodes support
- Soil stays saturated and loses strength
- Base was too thin for the soil conditions or usage
- Surface slope does not move water away consistently
- Joint material breaks down, letting more water into the system
Prevention steps that matter most:
- Control roof water: Downspouts should not dump next to patio edges.
- Maintain slope: Even a small low area can become a repeat problem once water finds it.
- Keep joints full: Joint sand is not cosmetic, it helps lock pavers and reduce movement. [1]
- Use the right cleaning method: Aggressive washing can strip joints and start a cycle of washout.
Mini-summary: The goal is not only to make the patio level today, but to reduce the water and movement that created the low spot in the first place. [1]
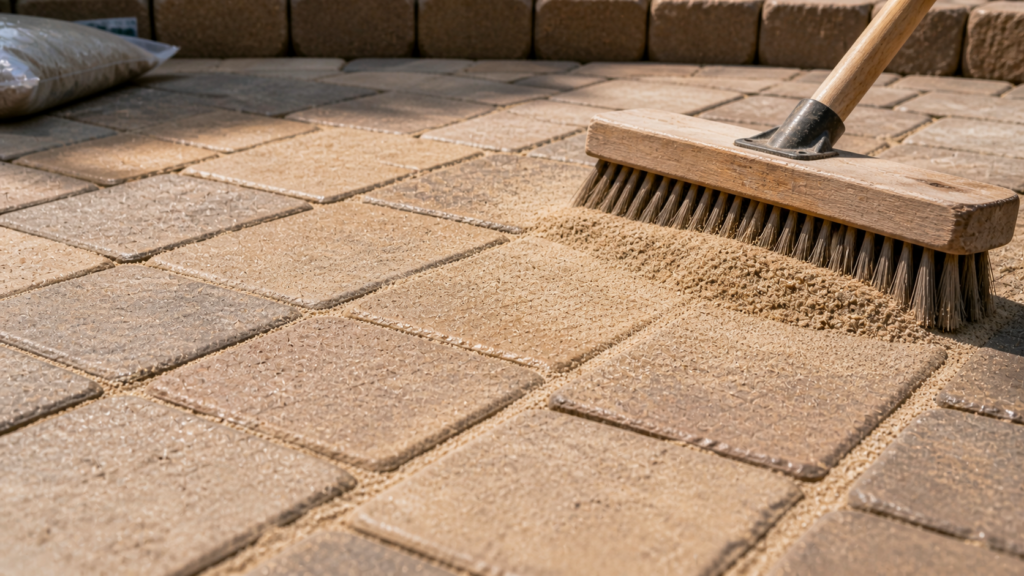
What is polymeric sand and when do you need polymeric sand replacement?
Polymeric sand is a jointing sand that hardens after proper installation and activation, helping stabilize joints and reduce washout compared to loose sand. It is often used during repairs because joint performance is closely tied to movement, weeds, and long-term appearance. [3] [4]
What polymeric sand does well:
- Helps resist joint erosion from rain and light cleaning
- Reduces shifting at joints when installed correctly
- Can discourage weed growth by keeping joints tighter
- Helps limit insect activity in joints in some situations [4]
When polymeric sand replacement is usually needed:
- Joints are visibly low, empty, or uneven
- Sand keeps washing out after storms
- Weeds return quickly because joints stay open and damp
- You re-leveled sections and need consistent joint fill
Installation conditions matter: Most jointing products require a dry surface, proper compaction, and careful wetting to avoid haze and weak joints. [3] [4]
If your patio was originally installed with standard joint sand, polymeric sand can be a strong upgrade during repair, but only when the base is stable and the joints are prepared correctly. [3]
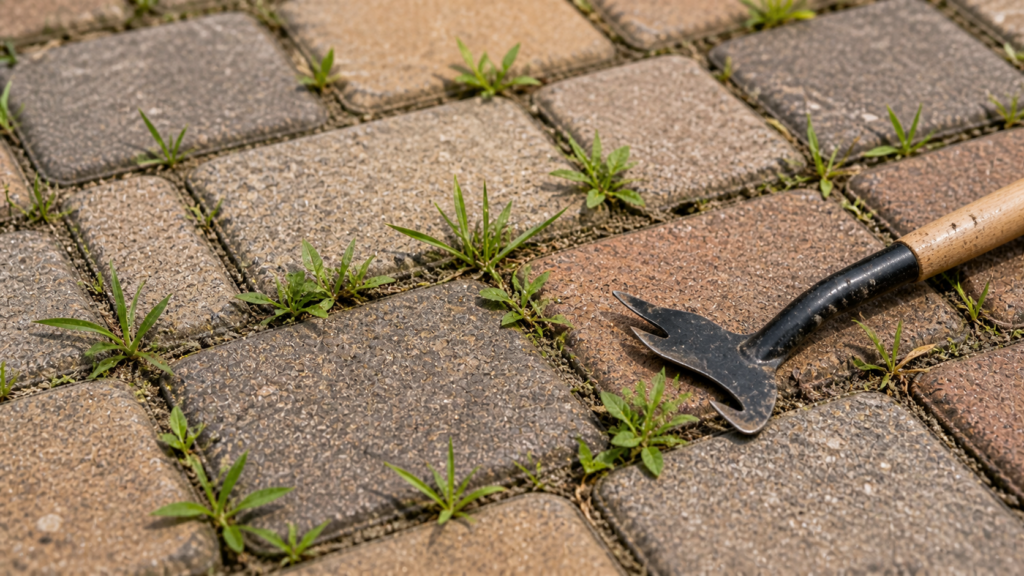
How do you stop weeds between pavers without damaging the joints?
The most important thing to understand is that weeds do not appear because pavers are failing. Weeds appear because joints are open enough to hold moisture and debris.
A practical weed control plan:
- Remove visible weeds and roots as completely as possible
- Clear organic debris from joints so seeds have less to feed on
- Restore joint sand depth so joints do not act like mini planters
- Choose joint sand that fits your patio and cleaning habits
- Adjust drainage if water is constantly flowing through the same joints
Do and do not list:
- Do: Pull weeds after rain when roots release easier
- Do: Refill joints before weeds become established
- Do: Use careful spot treatments only if you are comfortable following label directions
- Do not: Blast joints with high pressure water and expect weeds to stop
- Do not: Leave joints empty after cleaning
- Do not: Assume one treatment fixes the underlying joint condition
Inline label: Long-term control comes from joint management. When joints stay full and firm, weeds have a harder time taking hold. [1]
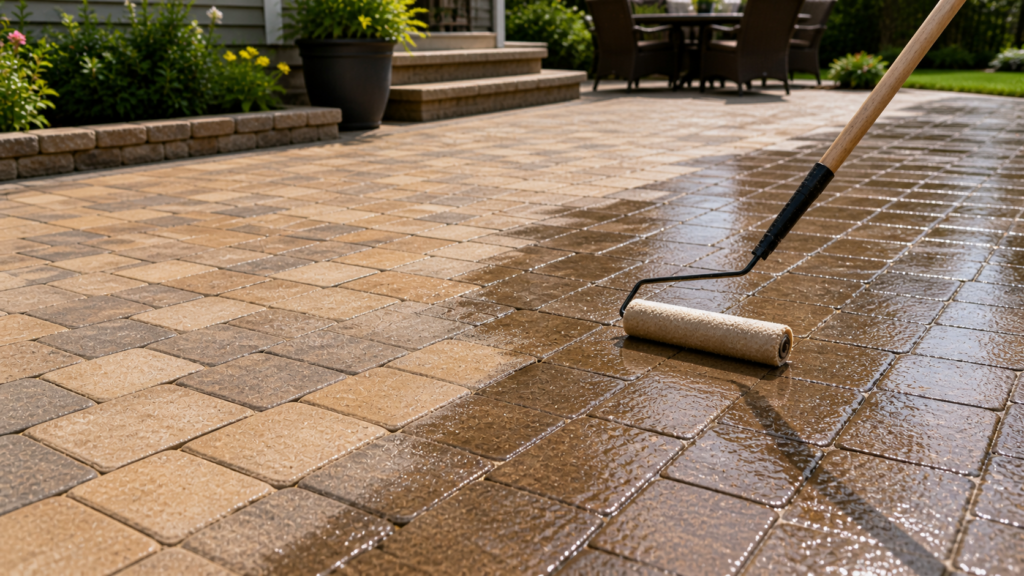
Should you seal pavers after repair and re-sanding?
Sealing is optional, and it is not automatically the next step after repair. Some patios benefit from sealing, while others perform better with routine cleaning and joint upkeep.
Reasons homeowners choose sealing:
- Easier cleanup for spills and organic staining
- More consistent color appearance on some pavers
- Added surface protection in high-use areas [5]
Reasons homeowners skip sealing:
- Ongoing maintenance cycle, since sealers wear and may need reapplication
- Risk of slipperiness depending on product and surface finish
- Potential for uneven appearance if applied incorrectly [5]
What matters most after repair: The patio should be stable, joints should be properly filled, and cleaning products should match the surface and joint type. If you seal, follow product guidance closely and confirm compatibility with your joint material. [5]
If you want a deeper look at how paver systems are built and protected from the start, The Ultimate Guide to Paver Brick Installation is a helpful companion read.
How long does it take to repair a paver patio and what is the process?
Timeline depends on how many square feet are affected, how deep the settlement goes, and whether drainage corrections are part of the plan. Weather also matters in Illinois, because wet conditions can affect how well materials compact and set.
Typical time ranges by scope:
| Repair scope | What it usually includes | Typical timeline |
|---|---|---|
| Minor | Reset a few pavers, restore joints | Part of a day to one day |
| Moderate | Relevel a section, rebuild edge, re-sand | One to two days |
| Major | Multiple sections, drainage corrections, broader base work | Multiple days depending on access and size |
What the process looks like on-site:
Step 1: Evaluate the problem area and identify water patterns
Step 2: Lift and stage pavers carefully so they can be reused
Step 3: Restore base and bedding layers, then re-set grade
Step 4: Compact, re-sand, compact again, and confirm alignment
Step 5: Clean up the surface and review maintenance steps with you
In Northern Illinois, scheduling repairs before peak entertaining season is a smart move, because small low spots can turn into bigger repairs after a wet spring. [1]
What affects the cost to repair and maintain a paver patio without exact prices?
Paver patio repair cost depends on how much of the patio must be lifted and how much base and drainage correction is required. The same visible symptom can require very different work depending on the cause.
Primary cost drivers:
- Size of the affected area and how many pavers must be lifted
- Depth of base correction and whether soft subgrade must be stabilized
- Need for drainage changes near the patio
- Edge restraint condition and whether borders need rebuild
- Joint condition and whether polymeric sand replacement is recommended
- Access for moving materials and compacting properly
- Cleaning needs before final sanding or sealing
Compact text chart: cost rises when
More pavers must be lifted
More base must be rebuilt
Water issues must be corrected
Edges must be reconstructed
Surface must be cleaned and re-sanded across a larger footprint
If you are already thinking about a bigger change, a repair evaluation can also be used to plan an upgrade path. Patio Cost Estimate for Spring Installs can help you think through timing and scope if you are considering expanding the patio or adding connected hardscape features.
When should you hire a paver patio contractor in Northern Illinois / Illinois?
If you are searching paver patio repair near me, the most important thing is hiring someone who treats the cause, not just the symptom.
Hire a pro when:
- Multiple areas are sinking or rocking
- You have recurring puddles that do not improve with small fixes
- Edges are spreading and joints keep opening
- You suspect downspout or grading issues are feeding the problem
- You want polymeric sand replacement done correctly to avoid haze and weak joints
- You want repairs to blend cleanly into future upgrades
What to ask during an estimate:
- How will you confirm what caused the settling?
- What will you do differently so it does not settle again?
- Will the repair include compaction steps, and how will slope be verified? [1]
- Which joint sand do you recommend for my usage and cleaning habits? [3] [4]
- If I want to expand later, how can this repair be planned to tie in?
For homeowners in Northern Illinois and across Illinois, a patio that looks slightly off today can become a tripping hazard and a bigger repair later. A straightforward site visit is usually the fastest way to define scope and avoid guesswork.
Short CTA: If you want your patio to feel solid again and look clean at the joints, Land and Lawn Services can evaluate the problem area, recommend the right fix, and provide a clear plan for repair and upgrade options.
What paver patio repair and maintenance questions do homeowners ask most often?
Homeowners tend to search for the same handful of issues because paver problems show up in predictable ways. The answers below are written to help you decide what is truly DIY and what usually needs professional releveling or joint restoration.
Can you relevel pavers without removing the whole patio?
Yes, if the problem is limited to a section and the surrounding base is stable, releveling can be done by lifting only the affected area, rebuilding the bedding, and re-setting the pavers.
The key is matching the repair boundary to the real settlement boundary. If you only fix the deepest spot and ignore the surrounding soft base, the low area often spreads again.
How often do you need polymeric sand replacement?
It depends on weather exposure, cleaning habits, and how well the joints were installed in the first place. Some patios hold joints for years, while others lose material quickly if water flows through joints or if aggressive cleaning strips sand. [3] [4]
A practical rule is to inspect joints each spring. If joints look low, open, or uneven, topping off or replacing joint material can prevent bigger movement later. [2]
Will pressure washing remove joint sand?
It can, especially if you use a narrow tip, high pressure, or wash directly along the joint line. Even careful washing can pull sand from shallow joints if the joint material is already weak.
If you pressure wash, use a wider fan tip, keep the wand moving, and plan to replace lost joint sand afterward. When in doubt, a gentler cleaning method plus re-sanding is usually safer for long-term stability. [5]
Why do weeds keep coming back between pavers?
Weeds usually return when joints are open enough to hold moisture and debris. Seeds land, organic matter collects, and the joint becomes a growth pocket.
The lasting fix is joint management, not just weed removal. Clean the joints, restore joint sand to the right height, and reduce water concentration in that area so the joints do not stay damp.
Is sealing required after sanding?
No, sealing is optional. Sealing can help with stain resistance and color uniformity, but it is not required for a patio to function well. [5]
If you do seal, the surface must be clean and dry, and your joint material should be stable first. A rushed seal on a damp surface or over weak joints can lead to appearance issues.
Can you fix puddles on a paver patio?
Often, yes. Puddles typically indicate a low spot or a slope problem. If it is a local low spot, lifting and re-setting that area can restore drainage.
If puddles show up across multiple areas, the patio may need broader grade correction. It is also important to confirm that runoff is not being directed onto the patio from nearby surfaces.
Why do pavers keep sinking in the same spot?
Recurring sinking usually means one of two things: water is repeatedly washing out support, or the subgrade was never stable in that zone. Simply re-setting the pavers without addressing the underlying cause often leads to repeat settling. [1]
A more durable fix typically includes correcting drainage patterns and rebuilding the base in that area so it can resist seasonal saturation and movement.
What is the best joint sand for my patio?
The best choice depends on joint width, paver style, and how you want to maintain the patio. Some homeowners prefer traditional joint sand for easier touch-ups, while others prefer a hardening joint sand to reduce washout and joint growth. [3] [4]
A contractor can recommend the right option after measuring joint width and reviewing how water moves across the surface, especially in Illinois weather.
If you are ready to fix a sinking area, refresh the joints, or plan upgrades that tie into the patio, Land and Lawn Services can schedule an on-site evaluation and provide an estimate for releveling, paver patio sanding, polymeric sand replacement, and connected hardscape improvements in Northern Illinois and surrounding areas.
Key Takeaways
- Most patio issues come from base, joint, or drainage conditions, not the pavers themselves.
- Fixing sinking pavers lasts longer when the underlying layers are rebuilt and compacted correctly.
- Full joints matter because they help stabilize the surface and reduce weed growth and washout.
- Sealing is optional and should be chosen based on traction, appearance, and maintenance goals.
- A targeted evaluation helps match repair scope to the real cause and supports future upgrades.
- Small paver issues rarely fix themselves. If you are noticing low spots, loose joints, or recurring weeds, contact Land and Lawn Services to schedule a paver patio repair evaluation and stop the problem before it turns into a larger rebuild.
References
Paver Maintenance Guides
[1] Operation and Maintenance Guide for Interlocking Concrete Pavement. Accessed May 5, 2026.
[2] Tech Spec 23: Maintenance Guide for Permeable Interlocking Concrete Pavements. PDF. Accessed May 5, 2026.
Joint Sand Guidelines
[3] Polymeric Sand Installation Guidelines. PDF. Accessed May 5, 2026.
[4] Polymeric Sand: Installation Guidance and Best Practices. Accessed May 5, 2026.
Cleaning and Weather Research
[5] Cleaning and Sealing Interlocking Concrete Pavement: A Maintenance and Protection Guide. PDF. Accessed May 5, 2026.
[6] Impact of Freeze-Thaw Cycles on Pavement Materials and Damage Mechanisms. Accessed May 5, 2026.